NEWSLETTER

Enter your email:
Construction Topics
ADS
Become a FB fan
![]()
Construction Network
![]()
 CONSTRUCTION KNOWLEDGE >>
GENERAL TECHNICAL KNOWLEDGE >>
CONSTRUCTION KNOWLEDGE >>
GENERAL TECHNICAL KNOWLEDGE >>
SIX SIMPLE MACHINES
1. Why Should I Care about 6 Simple Machines?
2. How Levers Work?
3. How Blocks (Pulleys) Work?
4. How a Wheel and Axle Works?
5. How an Inclined Plane (Wedge) Works?
6. How a Screw Works?
7. How Gears Work?
8. What Public Domain Documents are Available for Further Study?
9. Tricks of the Trade & Rules of Thumb for Simple Machines:
Why Should I Care about 6 Simple Machines?
You should care because it's cool stuff that helps you understand how
almost everything works on the jobsite. The text on this page is lifted
from the US Navy training manuals and referenced throughout the page.
Through the ages, ships have evolved from crude rafts to the huge complex cruisers and carriers of today’s Navy. It was a long step from oars to sails, another long step from sails to steam, and another long step to today’s nuclear power. Each step in the progress of shipbuilding has involved the use of more and more machines. Today’s Navy personnel are specialists in operating and maintaining machinery. Boatswains operate winches to hoist cargo and the anchor; personnel in the engine room operate pumps, valves, generators, and other machines to produce and control the ship’s power; personnel in the weapons department operate shell hoists and rammers and elevate and train the guns and missile launchers; the cooks operate mixers and can openers; personnel in the CB ratings drive trucks and operate cranes, graders, and bulldozers. In fact, every rating in the Navy uses machinery sometime during the day’s work. Each machine used aboard ship has made the physical work load of the crew lighter; you don’t walk the capstan to raise the anchor, or heave on a line to sling cargo aboard. Machines are your friends. They have taken much of the backache and drudgery out of a sailor’s lift. Reading this book should help you recognize and understand the operation of many of the machines you see about you.
WHAT IS A MACHINE? As you look about you, you probably see half a dozen machines that you don’t recognize as such. Ordinarily you think of a machine as a complex device-a gasoline engine or a typewriter. They are machines; but so are a hammer, a screwdriver, a ship’s wheel. A machine is any device that helps you to do work. It may help by changing the amount of force or the speed of action. A claw hammer, for example, is a machine. You can use it to apply a large force for pulling out a nail; a relatively small pull on the handle produces a much greater force at the claws. We use machines to transform energy. For example, a generator transforms mechanical energy into electrical energy. We use machines to transfer energy from one place to another. For example, the connecting rods, crankshaft, drive shaft, and rear axle of an automobile transfer energy from the engine to the rear wheels. Another use of machines is to multiply force. We use a system of pulleys (a chain hoist, for example) to lift a heavy load. The pulley system enables us to raise the load by exerting a force that is smaller than the weight of the load. We must exert this force over a greater distance than the height through which the load is raised; thus, the load will move slower than the chain on which we pull. The machine enables us to gain force, but only at the expense of speed. Machines may also be used to multiply speed. The best example of this is the bicycle, by which we gain speed by exerting a greater force. Machines are also used to change the direction of a force. For example, the Signalman’s halyard enables one end of the line to exert an upward force on a signal flag while a downward force is exerted on the other end. There are only six simple machines: the lever, the block, the wheel and axle, the inclined plane, the screw, and the gear. Physicists, however, recognize only two basic principles in machines: those of the lever and the inclined plane. The wheel and axle, block and tackle, and gears may be considered levers. The wedge and the screw use the principle of the inclined plane. When you are familiar with the principles of these simple machines, you can readily understand the operation of complex machines. Complex machines are merely combinations of two or more simple machines.
![]()
How Levers Work?
THE LEVER The simplest machine, and perhaps the
one with which you are most familiar, is the lever. A seesaw is a
familiar example of a lever in which one weight balances the other. You
will find that all levers have three basic parts: the fulcrum (F), a
force or effort (E), and a resistance (R). Look at the lever in figure
1-1.
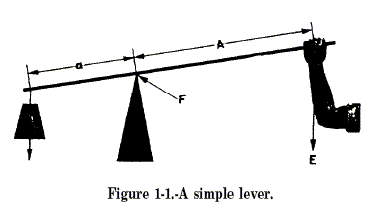
You see the pivotal point (fulcrum) (F); the effort (E), which is applied at a distance (A) from the fulcrum; and a resistance (R), which acts at a distance (a) from the fulcrum. Distances A and a are the arms of the lever.
CLASSES OF LEVERS The three classes of levers are shown in figure 1-2. The location of the fulcrum (the fixed or pivot point) in relation to the resistance (or weight) and the effort determines the lever class.
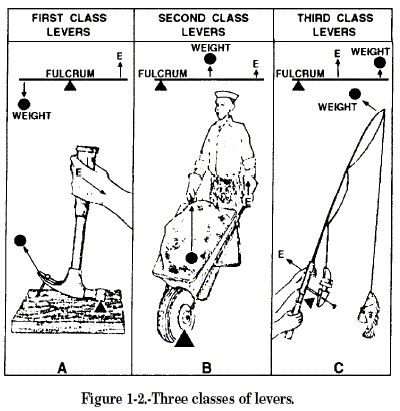
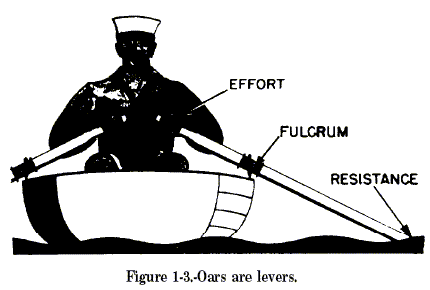
First Class In the first class (fig. 1-2, part A), the fulcrum is located between the effort and the resistance. As mentioned earlier, the seesaw is a good example of a first-class lever. The amount of weight and the distance from the fulcrum can be varied to suit the need. Notice that the sailor in figure 1-3 applies effort on the handles of the oars. An oar is another good example. The oarlock is the fulcrum, and the water is the resistance. In this case, as in figure 1-1, the force is applied on one side of the fulcrum and the resistance to be overcome is applied to the opposite side; hence, this is a first class lever. Crowbars, shears, and pliers are common examples of this class of levers.
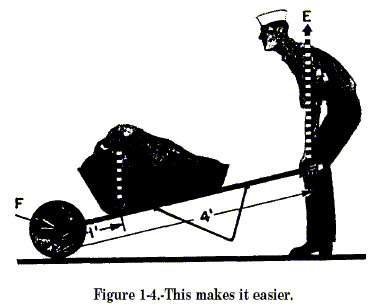
Second Class The second class of lever (fig. 1-2, part B) has the fulcrum at one end, the effort applied at the other end, and the resistance somewhere between those points. The Figure 1-2.-Three classes of levers. Figure 1-3.-Oars are levers. wheelbarrow in figure 1-4 is a good example of a second-class lever. If you apply 50 pounds of effort to the handles of a wheelbarrow 4 feet from the fulcrum (wheel), you can lift 200 pounds of weight 1 foot from the fulcrum. If the load were placed farther away from the wheel, would it be easier or harder to lift? Levers of the first and second class are commonly used to help in overcoming big resistances with a relatively small effort.
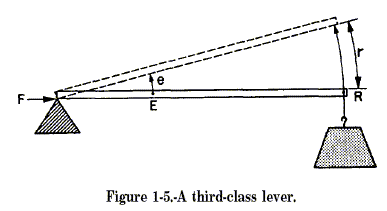
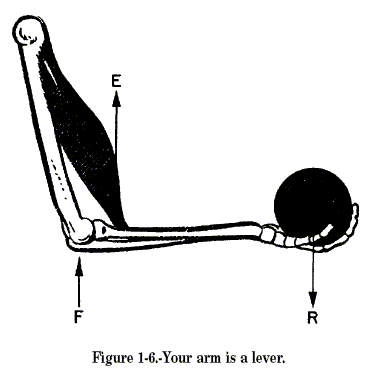
Third Class Sometimes you will want to speed up the movement of the resistance even though you have to use a large amount of effort. Levers that help you accomplish this are in the third class of levers. As shown in figure 1-2, part C, the fulcrum is at one end of the lever, and the weight or resistance to be overcome is at the other end, with the effort applied at some point between. You can always spot the third-class levers because you will find the effort applied between the fulcrum and the resistance. Look at figure 1-5. It is easy to see that while E moved the short distance (e), the resistance (R) was moved a greater distance (r). The speed of R must have been greater than that of E, since R covered a greater distance in the same length of time. Your arm (fig. 1-6) is a third-class lever. It is this lever action that makes it possible for you to flex your arms so quickly. Your elbow is the fulcrum. Your biceps muscle, which ties onto your forearm about an inch below the elbow, applies the effort; your hand is the resistance, located about 18 inches from the fulcrum. In the split second it takes your biceps muscle to contract an inch, your hand has moved through an 18-inch arc. You know from experience that it takes a big pull at E to overcome a relatively small resistance at R. Just to experience this principle, try closing a door by pushing on it about 3 or 4 inches from the hinges (fulcrum). The moral is, you don’t use third-class levers to do heavy jobs; you use them to gain speed.
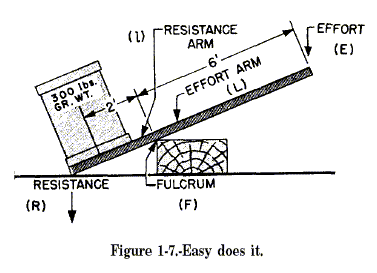
One convenience of machines is that you can determine in advance the forces required for their operation, as well as the forces they will exert. Consider for a moment the first class of levers. Suppose you have an iron bar, like the one shown in figure 1-7. This bar is 9 feet long, and you want to use it to raise a 300-pound crate off the deck while you slide a dolly under the crate; but you can exert only 100 pounds to lift the crate. So, you place the fulcrum-a wooden block-beneath one end of the bar and force that end of the bar under the crate. Then, you push down on the other end of the bar. After a few adjustments of the position of the fulcrum, you will find that your 100-pound force will just fit the crate when the fulcrum is 2 feet from the center of the crate. That leaves a 6-foot length of bar from the fulcrum to the point where you pushdown. The 6-foot portion is three times as long as the distance from the fulcrum to the center of the crate. And you lifted a load three times as great as the force you applied (3 x 100 = 300 pounds).
There is another thing about the first and second classes of levers that
you have probably noticed by now.
Since they can be used to magnify the applied force, they provide
positive mechanical advantages. The third-class
lever provides what is called a fractional mechanical advantage, which
is really a mechanical disadvantage—
you use more force than the force of the load you lift.
In the wheelbarrow problem, you saw that a 50-pound pull actually
overcame the 200-pound weight
Figure 1-9.-A curved lever arm. of the sand. The sailor’s effort was
magnified four times, so you may say that the mechanical advantage of
the
wheelbarrow is 4. Expressing the same idea in mathematical terms,
MECHANICAL ADVANTAGE = RESISTANCE/EFFORT
or, in the case of the wheelbarrow, M.A. = 200/50 = 4
This rule—mechanical advantage equals resistance (load) divided by
effort —applies to all machines.
The mechanical advantage of a lever may also be found by dividing the
length of effort arm A by the length
of resistance arm a. Stated as a formula, this reads:
M.A. of a lever = Effort Arm/Resistance Arm
How does this apply to third-class levers? Your muscle pulls with a force of 1,800 pounds to lift a 100-pound projectile. So you have a mechanical advantage of 100/1800 or 1/18th, which is fractional-less than 1.
The basic machines get used every day on your jobsite. If you understand the principles, you’ll be in a better position to solve problems that develop. Think of a simple but treacherous example. A building partially collapses and traps a worker under a big chunk of concrete floor. A back hoe can’t get into the space and you have to act quickly.
The piece of floor is about 8’ x 4’ and 6” thick. You know, or should know, that concrete weighs 150 pounds per cubic foot and that 8 x 4 x .5 = 16 cf. So 16 cf x 150 lb/cf = 2,400 pounds.
To lift the concrete off the trapped worker, you’d need 12 guys each lifting 100 pounds to lift half the weight, to lift it up like you were lifting the load on a wheel barrow (which is a 2nd class lever). But you don’t have 12 guys, you’ve got two guys and some long sections of 3” sprinkler piping. You know you could use the pipe as a 1st class lever to lift the slab.
So how long a piece of pipe do you need? If you’ve only got two guys to help with the lever, and one to pull the trapped worker out, you could assume that each guy could pull down 150 pounds, so you have a force of 300 pounds to work with. If you have a pivot point 2’ from your lift point, you need at lease 8’ of pipe on the side of pivot point to lift the 1200 pound concrete and free the worker. So if you grab a 12’ section of pipe, you free the trapped worker.
If you only have one person to lift, you probably could still free the guy if you have a 20’ section of pipe. The ability to do those quick calculations, and even more importantly, to understand the basic lever principles will be useful for the rest of your life. So why not take a few minutes and learn the basics of the 6 simple machines?
Additional information and explanation is available in the following,
Basic Machines Training Course - US Navy ("Levers"
excerpt, NAVEDTRA 14037, 1994)
![]()
How Blocks (Pulleys) Work?
Blocks or pulleys are simple machines that have many
uses aboard ship, as well as onshore. Remember how your mouth hung open
as you watched movers taking a piano out of a fourth story window? The
guy on the end of the tackle eased the piano safely to the sidewalk with
a mysterious arrangement of blocks and ropes. Or, you’ve been in the
country and watched the farmer use a block and tackle to put hay in a
barn. Since old Dobbin or the tractor did the hauling, there was no need
for a fancy arrangement of ropes and blocks. Incidentally, you’ll often
hear the rope or tackle called the fall, block and tack, or block and
fall. In the Navy you’ll rig a block and tackle to make some of your
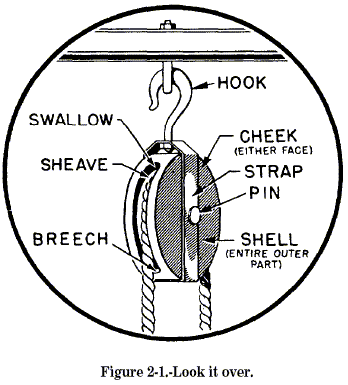
work easier. Learn the names of the parts of a block. Figure 2-1 will
give you a good start on this. Look at the single block and see some of
the ways you can use it. If you lash a single block to a fixed object-an
overhead, a yardarm, or a bulkhead-you give yourself the advantage of
being able to pull from a convenient direction. For example, in figure
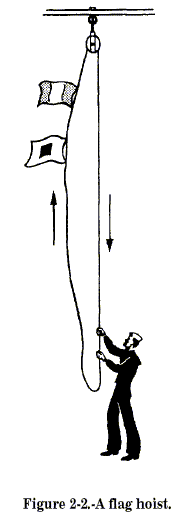
2-2 you haul up a flag hoist, but you really pull down. You can do this
by having a single sheaved block made fast to the yardarm. This makes it
possible for you to stand in a convenient place near the flag bag and do
the job. Otherwise you would have to go aloft, dragging the flag hoist
behind you.
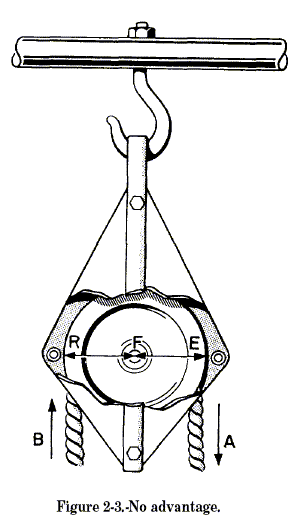
MECHANICAL ADVANTAGE
With a single fixed sheave, the force of your down pull on the fall
must be equal to the weight of the object hoist. You can’t use this rig
to lift a heavy load or resistance with a small effort-you can change
only the direction of your pull. A single fixed block is a first-class
lever with equal arms. The arms (EF and FR) in figure 2-3 are equal;
hence, the mechanical advantage is 1. When you pull down at A with a
force of 1 pound, you raise a load of 1 pound at B. A single fixed block
does not magnify force nor speed. You can, however, use a single block
and fall to magnify the force you exert. Notice in figure 2-4 that the
block is not fixed.
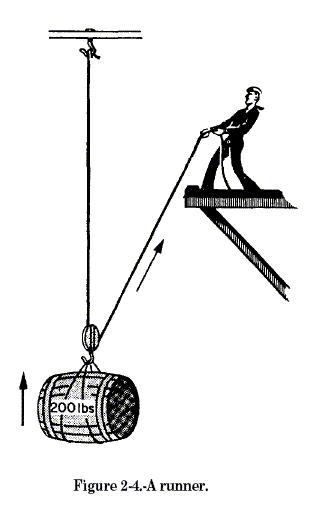
The fall is doubled as it supports the 200-pound cask. When rigged
this way, you call the single block and fall a runner. Each half of the
fall carries one-half of the total bad, or 100 pounds. Thus, with the
runner, the sailor is lifting a 200-pound cask with a 100-pound pull.
The mechanical advantage is 2. Check this by the formula:

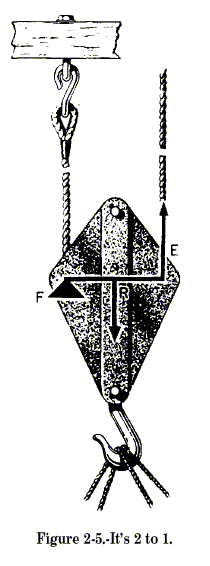
The single movable block in this setup is a second-class lever. See
figure 2-5. Your effort (E) acts upward upon the arm (EF), which is the
diameter of the sheave. The resistance (R) acts downward on the arm
(FR), which is the radius of the sheave. Since the diameter is twice the
radius, the mechanical advantage is 2. When the effort at E moves up 2
feet, the load at R is raised only 1 foot. That’s something to remember
about blocks and falls—if you are actually getting a mechanical
advantage from the system. The length of rope that passes through your
hands is greater than the distance that the load is raised. However, if
you can lift a big load with a small effort, you don’t care how much
rope you have to pull. The sailor in figure 2-4 is in an awkward
position to pull. If he had another single block handy, he could use it
to change the direction of the pull, as in figure 2-6. This second
arrangement is known as a gun tackle. Because the second block is fixed,
it merely changes the direction of pull—and the mechanical advantage of
the whole system remains 2. You can arrange blocks in several ways,
depending on the job to be done and the mechanical advantage you want to
get.

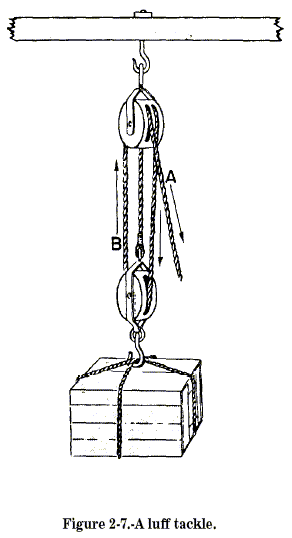
For example, a luff tack consists of a double block and a single
block, rigged as in figure 2-7. Notice that the weight is suspended by
the three parts of rope that extend from the movable single block. Each
part of the rope carries its share of the load. If the crate weighs 600
pounds, then each of the three parts of the rope supports its share—200
pounds. If there’s a pull of 200 pounds downward on rope B, you will
have to pull downward with a force of 200 pounds on A to counterbalance
the pull on B. Neglecting the friction in the block, a pull of 200
pounds is all that is necessary to raise the crate. The mechanical
advantage is:
Here’s a good tip. If you count the number of parts of rope going to and
from the movable block you can figure the mechanical advantage at a
glance. This simple rule will help you to approximate the mechanical
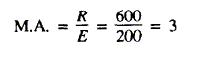
advantage of most tackles you see in the Navy. Many combinations of
single-, double-, and triplesheave blocks are possible. Two of these
combinations are shown in figure 2-8. You can secure the dead end of the
fall to the movable block. The advantage is increased by 1. Notice that
this is done in figure 2-7. That is a good point to remember. Remember,
also, that the strength of your fall—rope—is a limiting factor in any
tackle. Be sure your fall will carry the load. There is no point in
rigging a 6-fold purchase that carries a 5-ton load with two triple
blocks on a 3-inch manila rope attached to a winch. The winch could take
it, but the rope couldn’t. Now for a review of the points you have
learned about blocks, and then to some practical applications aboard
ship: With a single fixed block the only advantage is the change of
direction of the pull. The mechanical advantage is still 1. A single
movable block gives a mechanical advantage of 2. Many combinations of
single, double, and triple blocks can be rigged to give greater
advantages. Remember that the number of parts of the fall going to and
from the movable block tells you the approximate mechanical advantage of
the tackle. If you fix the dead end of the fall to the movable block you
increase the mechanical advantage by one 1.
Additional information and explanation is available in the following,
Basic Machines Training Course - US Navy ("Block
and Tackle" excerpt, NAVEDTRA 14037, 1994)
![]()
How a Wheel & Axle Works?
Have you ever tried to open a door when the knob was missing? If you
have, you know that trying to twist that small four-sided shaft with
your fingers is tough work. That gives you some appreciation of the
advantage you get by using a knob. The doorknob is an example of a
simple machine called a wheel and axle. The steering wheel on an
automobile, the handle of an ice cream freezer, and a brace and bit are
all examples of a simple machine. All of these devices use the wheel and
axle to multiply the force you exert. If you try to turn a screw with a
screwdriver and it doesn’t turn, stick a screwdriver bit in the chuck of
a brace. The screw will probably go in with little difficulty. There’s
something you’ll want to get straight right at the beginning. The
wheel-and-axle machine consists of a wheel or crank rigidly attached to
the axle, which turns with the wheel. Thus, the front wheel of an
automobile is not a wheel-and-axle machine because the axle does not
turn with the wheel.
MECHANICAL ADVANTAGE
How does the wheel-and-axle arrangement help to magnify the force you
exert? Suppose you use a screwdriver bit in a brace to drive a stubborn
screw. Look at figure 3-1, view A. You apply effort on the handle that
moves in a circular path, the radius of which is 5 inches. If you apply
a 10-pound force on the handle, how much force will you exert against
the resistance at the screw? Assume the radius of the screwdriver blade
is 1/4 inch. You are really using the brace as a second-class lever—see
figure 3-1, view B. You can find the size of the resistance by using the
formula:
![]()
In that:
Substituting in the formula and solving:
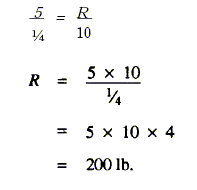
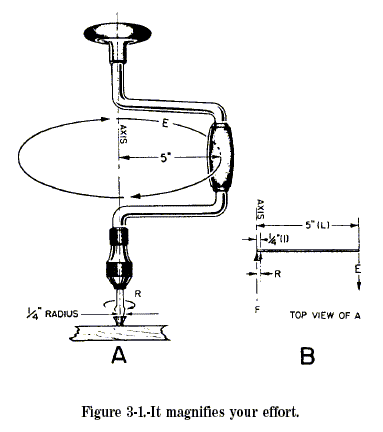
This means that the screwdriver blade will turn the screw with a force
of 200 pounds. The relationship between the radius of the diameters or
the circumferences of the wheel and axle tells you how much mechanical
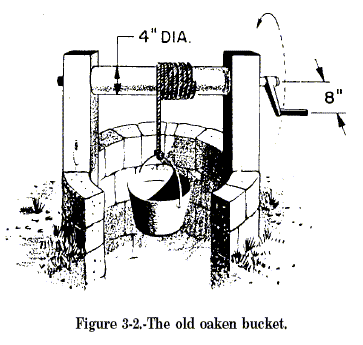
advantage you can get. Take another situation. You raise the old oaken
bucket, figure 3-2, using a wheel-and-axle arrangement. If the distance
from the center of the axle to the handle is 8 inches and the radius of
the drum around which the rope is wound is 2 inches, then you have a
theoretical mechanical advantage of 4. That’s why these rigs were used.
MOMENT OF FORCE
In several situations you can use the wheel-and-axle to speed up motion.
The rear-wheel sprocket of a bike, along with the rear wheel itself, is
an example. When you are pedaling, the sprocket is attached to the
wheel; so the combination is a true wheel-and-axle machine. Assume that
the sprocket has a circumference of 8 inches, and the wheel
circumference is 80 inches. If you turn the sprocket at a rate of one
revolution per second, each sprocket tooth moves at a speed of 8 inches
per second. Since the wheel makes one revolution for each revolution
made by the sprocket, any point on the tire must move through a distance
of 80 inches in 1 second. So, for every 8-inch movement of a point on
the sprocket, you have moved a corresponding point on the wheel through
80 inches. Since a complete revolution of the sprocket and wheel
requires only 1 second, the speed of a point on the circumference of the
wheel is 80 inches per second, or 10 times the speed of a tooth on the
sprocket. (NOTE: Both sprocket and wheel make the same number of
revolutions per second, so the speed of turning for the two is the
same.) Here is an idea that you will find useful in understanding the
wheel and axle, as well as other machines. You probably have noticed
that the force you apply to a lever starts to turn or rotate it about
the fulcrum. You also know that a sheave on a fall starts to rotate the
sheave of the block. Also when you turn the steering wheel of a car, it
starts to rotate the steering column. Whenever you use a lever, or a
wheel and axle, your effort on the lever arm or the rim of the wheel
causes it to rotate about the fulcrum or the axle in one direction or
another. If the rotation occurs in the same direction as the hands of a
clock, we call that direction clockwise. If the rotation occurs in the
opposite direction from that of the hands of a clock, we call that
direction of rotation counterclockwise.

A glance at figure 3-3 will make clear the meaning of these terms. The
force acting on the handle of a carpenter’s brace depends not only on
the amount of that force, but also on the distance from the handle to
the center of rotation. This is known as a moment of force, or a torque
(pronounced tork). Moment of force and torque have the same meaning.
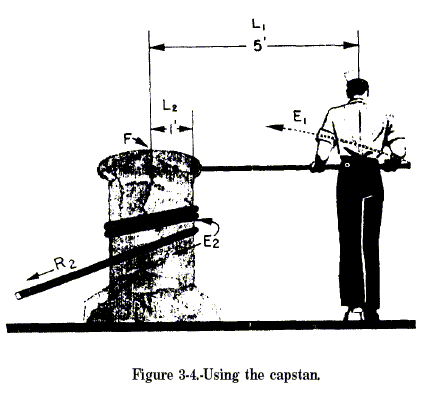
Look at the effect of the counterclockwise movement of the capstan bar
in figure 3-4. Here the amount of the effort is designated and the
distance from the point where you apply the force to the center of the
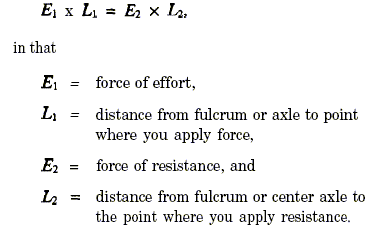
axle is L1 Then, E1 x L1 is the moment
of force. You’ll notice that this term includes both the amount of the
effort and the distance from the point of application of effort to the
center of the axle. Ordinarily, you measure the distance in feet and the
applied force in pounds. Therefore, you measure moments of force in
footpounds (ft-lb). A moment of force is frequently called a moment. By
using a longer capstan bar, the sailor in figure 3-4 can increase the
effectiveness of his push without making a bigger effort. If he applied
his effort closer to the head of the capstan and used the same force,
the moment of force would be less.
BALANCING MOMENTS
You know that the sailor in figure 3-4 would land flat on his face if
the anchor hawser snapped. As long as nothing breaks, he must continue
to push on the capstan bar. He is working against a clockwise moment of
force that is equal in magnitude, but opposite in direction, to his
counterclockwise moment of force. The resisting moment, like the effort
moment, depends on two factors. In the case of resisting moment, these
factors are the force (R2) with which the anchor pulls on the
hawser and the distance (L2) from the center of the capstan to
its rim. The existence of this resisting force would be clear if the
sailor let go of the capstan bar. The weight of the anchor pulling on
the capstan would cause the whole works to spin rapidly in a clockwise
direction—and good-bye anchor! The principle involved here is that
whenever the counterclockwise and the clockwise moments of force are in
balance, the machine either moves at a steady speed or remains at rest.
This idea of the balance of moments of force can be summed up by the
expression CLOCKWISE COUNTER = CLOCKWISE MOMENTS MOMENTS.
Since a moment of force is the product of the amount of the force times
the distance the force acts from the center of rotation, this expression
of equality may be written:
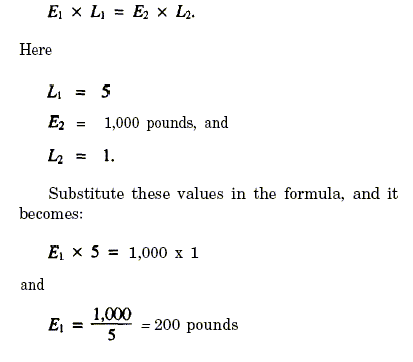
EXAMPLE 1:
Put this formula to work on a capstan problem. You grip a single
capstan bar 5 feet from the center of a capstan head with a radius of 1
foot. You have to lift a 1/2-ton anchor. How big of a push does the
sailor have to exert? First, write down the formula:
EXAMPLE 2:
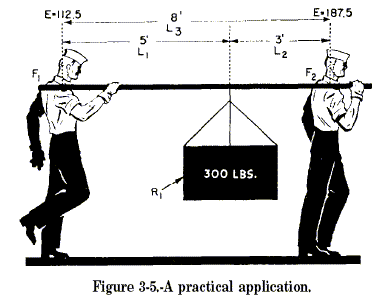
Consider now the sad case of Slim and Sam, as illustrated in figure
3-5. Slim has suggested that they carry the 300-pound crate slung on a
handy 10-foot pole. He was smart enough to slide the load up 3 feet from
Sam’s shoulder. Here’s how they made out. Use Slim’s shoulder as a
fulcrum (F1). Look at the clockwise movement caused by the
300-pound load. That load is 5 feet away from Slim’s shoulder. If R1
is the load, and L1 the distance from Slim’s shoulder
to the load, the clockwise (MA) moment is:![]()
With Slim’s shoulder still acting as the fulcrum, the resistance of
Sam’s effort causes a counterclockwise moment (MB)acting
against the load moment. This counterclockwise moment is equal to Sam’s
effort (E2) times the distance (L3) from his
shoulder to the fulcrum (F1) at Slim’s shoulder. Since L2
= 8 ft, the formula is:
![]()
There is no rotation, so the clockwise moment and the counterclockwise
moment are equal. MA = (MB) Hence:
So poor Sam is carrying 187.5 pounds of the 330-pound load. What is Slim
carrying? The difference between 300 and 187.5 = 112.5 pounds, of
course! You can check your answer by the following procedure. This time,
use Sam’s shoulder as the fulcrum (F2). The counterclockwise
moment (MC) is equal to the 300-pound load (R1)
times the distance (L2 = 3 feet) from Sam’s shoulder. MC
300 x 3 = 900 foot-pounds. The clockwise moment (MD) is
the result of Slim’s lift (E1) acting at a distance (L3)
from the fulcrum. L3 = 8 feet. Again, since counterclockwise
moment equals clockwise moment, you have: 900 = E1 x 8, and
Slim, the smart sailor, has to lift only 112.5 pounds. There’s a sailor
who really puts his knowledge to work.
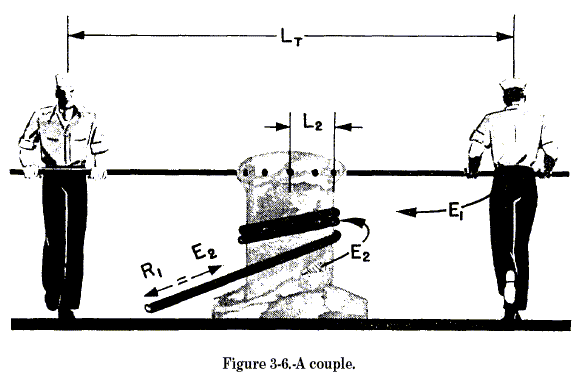
THE COUPLE
Take a look at figure 3-6. It’s another capstanturning situation. To
increase an effective effort, place a second capstan bar opposite the
first and another sailor can apply a force on the second bar. The two
sailors in figure 3-6 will apparently be pushing in opposite directions.
Since they are on opposite sides of the axle, they are actually causing
rotation in the same direction. If the two sailors are pushing with
equal force, the moment of force is twice as great as if only one sailor
were pushing. This arrangement is known technically as a couple. You
will see that the couple is a special example of the wheel and axle. The
moment of force is equal to the product of the total distance (Ln)
between the two points and the force (E1) applied by one
sailor. The equation for the couple may be written:
![]()
Additional information and explanation is available in the following,
Basic Machines Training Course - US Navy ("Wheel
and Axle" excerpt, NAVEDTRA 14037, 1994)
![]()
How an Inclined Plane (Wedge) Works?
You have probably watched a driver load barrels on a truck. He backs the
truck up to the curb. The driver then places a long double plank or ramp
from the sidewalk to the tailgate, and then rolls the barrel up the
ramp. A 32-gallon barrel may weigh close to 300 pounds when full, and it
would be a job to lift one up into the truck. Actually, the driver is
using a simple machine called the inclined plane. You have seen the
inclined plane used in many situations. Cattle ramps, a mountain highway
and the gangplank are familiar examples. The inclined plane permits you
to overcome a large resistance, by applying a small force through a
longer distance when raising the load. Look at figure 4-1.
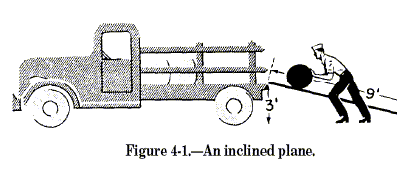
Here you see
the driver easing the 300-pound barrel up to the bed of the truck, 3
feet above the sidewalk. He is using a plank 9 feet long. If he didn’t
use the ramp at all, he’d have to apply 300-pound force straight up
through the 3-foot distance. With the ramp, he can apply his effort over
the entire 9 feet of the plank as he rolls the barrel to a height of 3
feet. It looks as if he could use a force only three-ninths of 300, or
100 pounds, to do the job. And that is actually the situation.
Here’s the formula:
![]()
In which L = length of the ramp, measured along the slope, 1 = height of
the ramp, R = weight of the object to be raised, or lowered, E = force
required to raise or lower the object. Now apply the formula this
problem: In this case, L = 9ft, 1 = 3 ft, and R = 300 lb. By
substituting these values in the formula, you get:
Since the ramp is three times as long as its height, the mechanical
advantage is three. You find the theoretical mechanical advantage by
dividing the total distance of the effort you exert by the vertical
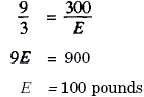
distance the load is raised or lowered. THE WEDGE The wedge is a special
application of the inclined plane. You have probably used wedges. Abe
Lincoln used a wedge to help him split logs into rails for fences. The
blades of knives, axes, hatchets, and chisels act as wedges when they
are forced into apiece of wood. The wedge is two inclined planes set
base-to-base. By driving the wedge full-length into the material to cut
or split, you force the material apart a distance equal to the width of
the broad end of the wedge. See figure 4-2. Long, slim wedges give high
mechanical advantage. For example, the wedge of figure 4-2 has a
mechanical advantage of six. The greatest value of the wedge is that you
can use it in situations in which other simple machines won’t work.
Imagine the trouble you’d have trying to pull a log apart with a system
of pulleys.
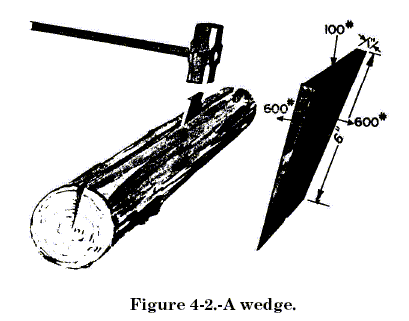
APPLICATIONS AFLOAT AND ASHORE
A common use of the inclined
plane in the Navy is the gangplank. Going aboard the ship by gangplank
illustrated in figure 4-3, is easier than climbing a sea ladder. You
appreciate the mechanical advantage of the gangplank even more when you
have to carry your seabag or a case of sodas aboard. Remember that hatch
dog in figure 1-10? The use of the dog to secure a door takes advantage
of the lever principle. If you look sharply, you can see that the dog
seats itself on a steel wedge welded to the door. As the dog slides
upward along this wedge, it forces the door tightly shut. This is an
inclined plane, with its length about eight times its thickness. That
means you get a theoretical mechanical advantage of eight. In chapter 1,
you figured that you got a mechanical advantage of four from the lever
action of the dog. The overall mechanical advantage is 8 x 4, or 32,
neglecting friction. Not bad for such a simple gadget, is it? Push down
with 50 pounds heave on the handle and you squeeze the door shut with a
force of 1,600 pounds on that dog. You’ll find the damage-control
parties using wedges by the dozen to shore up bulkheads and decks. A few
sledgehammer blows on a wedge will quickly and firmly tighten up the
shoring. Chipping scale or paint off steel is a tough job. How-ever, you
can make the job easier with a compressed-air chisel. The wedge-shaped
cutting edge of the chisel gets in under the scale or the paint and
exerts a large amount of pressure to lift the scale or paint layer. The
chisel bit is another application of the inclined plane.
SUMMARY
The inclined plane is a simple machine that lets you raise or lower
heavy objects by applying a small force over a long distance. You find
the theoretical mechanical advantage of the inclined plane by dividing
the length of the ramp by the perpendicular height of the load that is
raised or lowered. The actual mechanical advantage is equal to the
weight of the resistance or load, divided by the force that must be used
to move the load up the ramp. The wedge is two inclined planes set
base-to-base. It finds its greatest use in cutting or splitting
materials.
![]()
How a Screw Works?
The screw is a simple machine that has many uses. The vise on a
workbench makes use of the mechanical advantage (M.A.) of the screw. You
get the same advantage using glued screw clamps to hold pieces of
furniture together, a jack to lift an automobile, or a food processor to
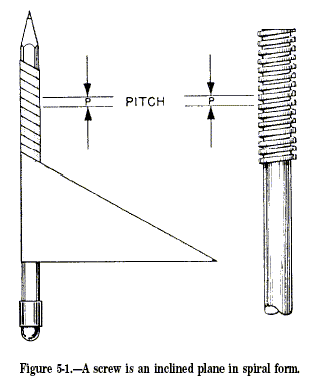
grind meat. A screw is a modification of the inclined plane. Cut a sheet
of paper in the shape of a right triangle and you have an inclined
plane. Wind this paper around a pencil, as in figure 5-1, and you can
see that the screw is actually an inclined plane wrapped around a
cylinder. As you turn the pencil, the paper is wound up so that its
hypotenuse forms a spiral thread. The pitch of the screw and paper is
the distance between identical points on the same threads measured along
the length of the screw.
THE JACK
To understand how the screw works, look at figure 5-2. Here you see the
type of jack screw used to raise a house or apiece of heavy machinery.
Notice that the jack has a lever handle; the length of the handle is
equal to r.
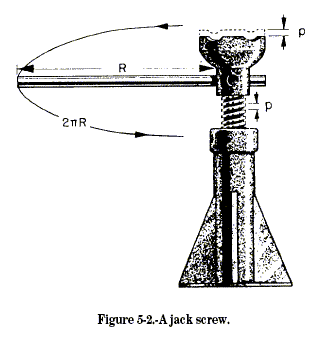
If you pull the lever handle around one turn, its outer end has
described a circle. The circumference of this circle is equal to
![]() .
(Remember that
.
(Remember that
![]() equals 3.14, or 22/7). That is the distance you must apply the
effort of the lever arm. At the same time, the screw has made one
revolution, raising its height to equal its pitch (p). You might
say that one full thread has come up out of the base. At any rate, the
load has risen a distance p. Remember that the theoretical mechanical
advantage (T.M.A.) is equal to the distance through which you apply the
effort or pull, divided by the distance and resistance the load is
moved. Assuming a 2-foot, or 24-inch, length for the lever arm and a
1/4-inch pitch for the thread, you can find the theoretical mechanical
advantage by the formula:
equals 3.14, or 22/7). That is the distance you must apply the
effort of the lever arm. At the same time, the screw has made one
revolution, raising its height to equal its pitch (p). You might
say that one full thread has come up out of the base. At any rate, the
load has risen a distance p. Remember that the theoretical mechanical
advantage (T.M.A.) is equal to the distance through which you apply the
effort or pull, divided by the distance and resistance the load is
moved. Assuming a 2-foot, or 24-inch, length for the lever arm and a
1/4-inch pitch for the thread, you can find the theoretical mechanical
advantage by the formula:
A 50-pound pull on the handle would result in a theoretical lift of 50 x
602 or about 30,000 pounds—15 tons for 50 pounds. However, jacks have
considerable friction loss. The threads are cut so that the force used
to overcome friction is greater than the force used to do useful work.
If the threads were not cut this way and no friction were present, the
weight of the load would cause the jack to spin right back down to the
bottom as soon as you released the handle.
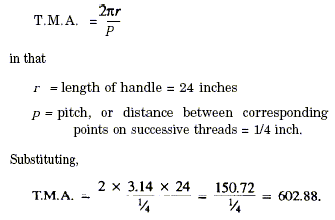
THE MICROMETER
In using the jack you exerted your effort through a distance of
![]() or 150 inches, to raise the screw 1/4 inch. It takes a lot of circular
motion to get a small amount of straight line motion from the head of
the jack. You will use this point to your advantage in the micrometer;
it’s a useful device for making accurate small measurements—measurements
of a few thousandths of an inch. In figure 5-3, you see a cutaway view
of a micrometer.
or 150 inches, to raise the screw 1/4 inch. It takes a lot of circular
motion to get a small amount of straight line motion from the head of
the jack. You will use this point to your advantage in the micrometer;
it’s a useful device for making accurate small measurements—measurements
of a few thousandths of an inch. In figure 5-3, you see a cutaway view
of a micrometer.

The thimble turns freely on the sleeve, rigidly attached to the
micrometer frame. The spindle attaches to the thimble and is fitted with
screw threads that move the spindle and thimble to the right or left in
the sleeve when you rotate the thimble. These screw threads are cut 40
threads to the inch. Hence, one turn of the thimble moves the spindle
and thimble 1/40 of inch. This represents one of the smallest divisions
on the micrometer. Four of these small divisions make 4/40 of an inch,
or 1/10 inch. Thus, the distance from 0 to 1 or 1 to 2 on the sleeve
represents 1/10, or 0.1, inch. To allow even finer measurements, the
thimble is divided into 25 equal parts. It is laid out by graduation
marks around its rim, as shown in figure 5-4. If you turn the thimble
through 25 of these equal parts, you have made one complete revolution
of the screw. This represents a lengthwise movement of 1/40 of an inch.
If you turn the thimble one of these units on its scale, you have moved
the spindle a distance of 1/25 of 1/40 inch, or 1/1000 of an inch—0.001
inch. The micrometer in figure 5-4 reads 0.503 inch, that is the true
diameter of the half-inch drill-bit shank measured. This tells you that
the diameter of this bit is 0.003 inch greater than its nominal diameter
of 1/2 inch—0.5000 inch. Because you can make accurate measurements with
this instrument, it is vital in every machine shop.
APPLICATIONS AFLOAT AND ASHORE
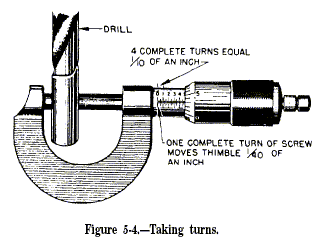
It’s a tough job to pull a rope or cable tight enough to get all the
slack out of it. However, you can do it by using a turnbuckle. The
turnbuckle (fig, 5-5) is an application of the screw. If you turn it in
one direction, it takes up the slack in a cable. Turning it the other
way allows slack in the cable. Notice that one bolt of the turnbuckle
has left-hand threads and the other bolt has right-hand threads. Thus,
when you turn the turnbuckle to tighten the line, both bolts tighten up.
If both bolts were right-hand threadstandard thread-one would tighten
while the other one loosened an equal amount. That would result in no
change in cable slack. Most turnbuckles have the screw threads cut to
provide a large amount of frictional resistance to keep the turnbuckle
from unwinding under load. In some cases, the turnbuckle has a locknut
on each of the screws to prevent slipping. You’ll find turnbuckles used
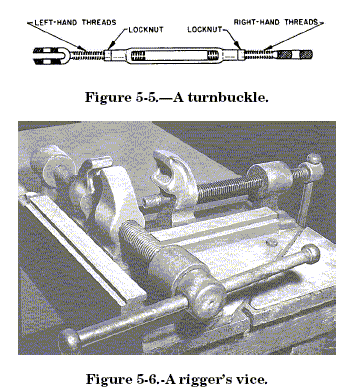
in a hundred different ways afloat and ashore. Ever wrestled with a
length of wire rope? Obstinate and unwieldy, wasn’t it? Riggers have
dreamed up tools to help subdue wire rope. One of these tools-the
rigger’s vise-is shown in figure 5-6. This rigger’s vise uses the
mechanical advantage of the screw to hold the wire rope in place. The
crew splices a thimble-a reinforced loop—onto the end of the cable.
Rotating the handle causes the jaw on that screw to move in or out along
its grooves. This machine is a modification of the vise on a workbench.
Notice the right-hand and left-hand screws on the left-hand clamp.
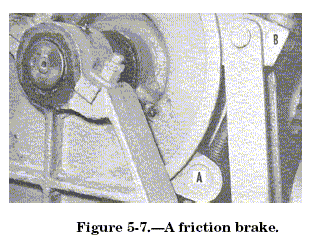
Figure 5-7 shows you another use of the screw. Suppose you want to stop
a winch with its load suspended in mid-air.
To do this, you need a brake. The brakes on most anchor or cargo winches
consist of a metal band that encircles the brake drum. The two ends of
the band fasten to nuts connected by a screw attached to a handwheel. As
you turn the handwheel, the screw pulls the lower end of the band (A) up
toward its upper end (B). The huge mechanical advantage of the screw
puts the squeeze on the drum, and all rotation of the drum stops. One
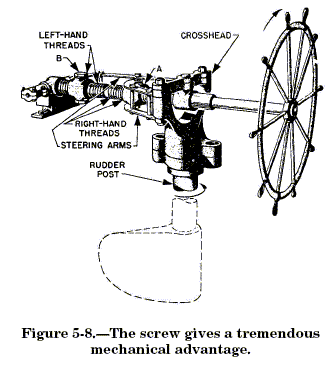
type of steering gear used on many small ships and as a spare steering
system on some larger ships is the screw gear. Figure 5-8 shows you that
the wheel turns a long threaded shaft. Half the threads— those nearer
the wheel end of this shaft-are right-hand threads. The other half of
the threads-those farther from the wheel—are left-hand threads. Nut A
has a right-hand thread, and nut B has a left-hand thread. Notice that
two steering arms connect the crosshead to the nuts; the crosshead turns
the rudder. If you stand in front of the wheel and turn it in a
clockwise direction— to your right—arm A moves forward and arm B moves
backward. That turns the rudder counterclockwise, so the ship swings in
the direction you turn the wheel. This steering mechanism has a great
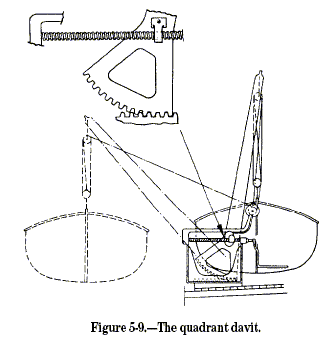
mechanical advantage. Figure 5-9 shows you another practical use of the
screw. The quadrant davit makes it possible for two men to put a
large lifeboat over the side with little effort. The operating handle
attaches to a threaded screw that passes through a traveling nut.
Cranking the operating handle in a counterclockwise direction (as you
face outboard), the nut travels outward along the screw. The traveling
nut fastens to the davit arm by a swivel. The davit arm and the boat
swing outboard as a result of the outward movement of the screw. The
thread on that screw is the self-locking type; if you let go of the
handle, the nut remains locked in position.
SUMMARY
You have learned the following basic information about the screw from
this chapter; now notice the different ways the Navy uses this simple
machine: The screw is a modification of the inclined plane— modified to
give you a high mechanical advantage. The theoretical mechanical
advantage of the screw can be found by the formula:
![]()
As in all machines, the actual mechanical advantage equals the
resistance divided by the effort. In many applications of the screw, you
make use of the large amount of friction that is commonly present in
this simple machine. By using the screw, you reduce large amounts of
circular motion to very small amounts of straight-line motion.
![]()
How Gears Work?
Did you ever take a clock apart to see what made it tick? Of course you
came out with some parts left over when you got it back together again.
And they probably included a few gear wheels. We use gears in many
machines. Frequently the gears are hidden from view in a protective case
filled with grease or oil, and you may not see them. An eggbeater gives
you a simple demonstration of the three jobs that gears do. They can
change the direction of motion, increase or decrease the speed of the
applied motion, and magnify or reduce the force that you apply. Gears
also give you a positive drive. There can be, and usually is, creep or
slip in a belt drive. However, gear teeth are always in mesh, so there
can be no creep and slip. Follow the directional changes in figure 6-1.
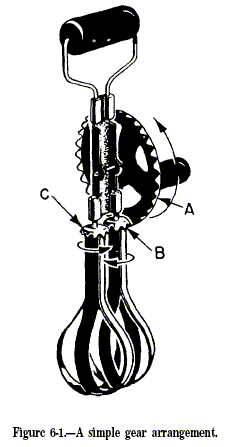
The crank handle turns in the direction shown by the
arrow—clockwise—when viewed from the right. The 32 teeth on the large
vertical wheel (A) mesh with the 8 teeth on the right-hand horizontal
wheel (B), which rotates as shown by the arrow. Notice that as B turns
in a clockwise direction, its teeth mesh with those of wheel C and cause
wheel C to revolve in the opposite direction. The rotation of the crank
handle has been transmitted by gears to the beater blades, which also
rotate. Now figure out how the gears change the speed of motion. There
are 32 teeth on gear A and 8 teeth on gear B. However, the gears mesh,
so that one complete revolution of A results in four complete
revolutions of gear B. And since gears B and C have the same number of
teeth, one revolution of B results in one revolution of C. Thus, the
blades revolve four times as fast as the crank handle. In chapter 1 you
learned that third-class levers increase speed at the expense of force.
The same happens with the eggbeater. The magnitude of force changes. The
force required to turn the handle is greater than the force applied to
the frosting by the blades. This results in a mechanical advantage of
less than one.
TYPES OF GEARS
When two shafts are not lying in the same straight line, but are
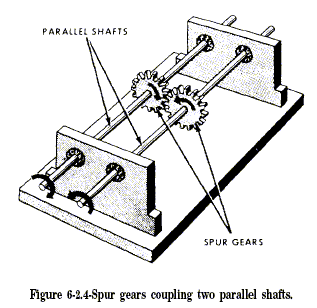
parallel, you can transmit motion from one to the other by spur gears.
This setup is shown in figure 6-2. Spur gears are wheels with mating
teeth cut in their surfaces so that one can turn the other without
slippage. When the mating teeth are cut so that they are parallel to the
axis of rotation, as shown in figure 6-2, the gears are called straight
spur gears. When two gears of unequal size are meshed together, the
smaller of the two is usually called a pinion. By unequal size, we mean
an unequal number of teeth causing one gear to be a larger diameter than
the other. The teeth, themselves, must be of the same size to mesh
properly. The most commonly used gears are the straight spur gears.
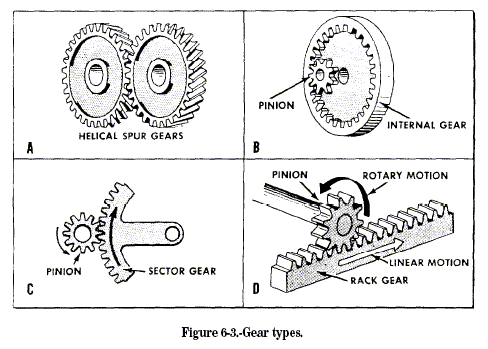
Often you’ll run across another type of spur gear called the helical
spur gear. In helical gears the teeth are cut slantwise across the
working face of the gear. One end of the tooth, therefore, lies ahead of
the other. Thus, each tooth has a leading end and a trailing end. Figure
6-3, view A, shows you the construction of these gears. In the straight
spur gears, the whole width of the teeth comes in contact at the same
time. However, with helical (spiral) gears, contact between two teeth
starts first at the leading ends and moves progressively across the gear
faces until the trailing ends are in contact. This kind of meshing
action keeps the gears in constant contact with one another. Therefore,
less lost motion and smoother, quieter action is possible.
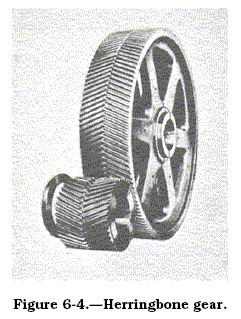
One disadvantage of this helical spur gear is the tendency of each gear
to thrust or push axially on its shaft. It is necessary to put a special
thrust bearing at the end of the shaft to counteract this thrust. You do
not need thrust bearings if you use herringbone gears like those shown
in figure 6-4. Since the teeth on each half of the gear are cut in
opposite directions, each half of the gear develops a thrust that
counterbalances the other half. You’ll find herringbone gears used
mostly on heavy machinery. Figure 6-3, views B, C, and D, also shows you
three other gear arrangements in common use. The internal gear in figure
6-3, view B, has teeth on the inside of a ring, pointing inward toward
the axis of rotation. An internal gear is meshed with an external gear,
or pinion, whose center is offset from the center of the internal gear.
Either the internal or pinion gear can be the driver gear, and the gear
ratio is calculated the same as for other gears—by counting teeth. You
only need a portion of a gear where the motion of the pinion is limited.
You use the sector gear shown in figure 6-3, view C, to save space and
material. The rack and pinion in figure 6-3, view D, are both spur
gears. The rack is a piece cut from a gear with an extremely large
radius. The rack-and-pinion arrangement is useful in changing rotary
motion into linear motion.
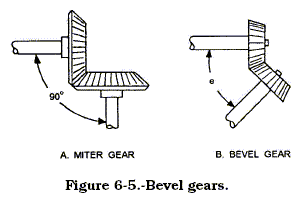
THE BEVEL GEAR
So far most of the gears you’ve learned about transmit motion between
parallel shafts. However, when shafts are not parallel (at an angle), we
use another type of gear called the bevel gear. This type of gear can
connect shafts lying at any given angle because you can bevel them to
suit the angle. Figure 6-5, view A, shows a special case of the bevel
gear-the miter gear. You use the miter gears to connect shafts having a
90-degree angle; that means the gear faces are beveled at a 45-degree
angle. You can see in figure 6-5, view B, how bevel gears are designed
to join shafts at any angle. Gears cut at any angle other than 45
degrees are bevel gears. The gears shown in figure 6-5 are straight
bevel gears, because the whole width of each tooth comes in contact with
the mating tooth at the same time. However, you’ll run across spiral
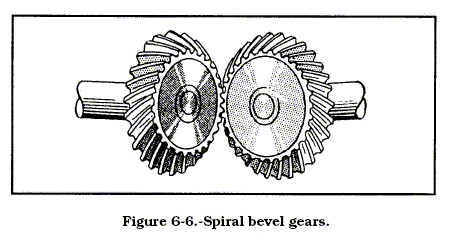
bevel gears with teeth cut to have advanced and trailing ends. Figure
6-6 shows you what spiral bevel gears look like. They have the same
advantage as other spiral (helical) gears—less lost motion and smoother,
quieter operation.
THE WORM AND WORM WHEEL
Figure 6-7.—Worm gears. Worm and worm-wheel combinations, like those in
figure 6-7, have many uses and advantages. However, it’s better to
understand their operating theory before learning of their uses and
advantages. Figure 6-7, view A, shows the action of a single-thread
worm. For each revolution of the worm, the worm wheel turns one tooth.
Thus, if the worm wheel has 25 teeth, the gear ratio is 25:1.
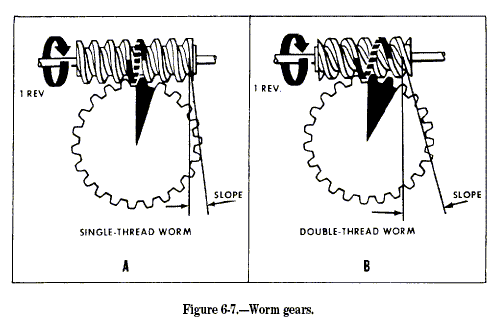
Figure 6-7, view B, shows a double-thread worm. For each revolution of
the worm in this case, the worm wheel turns two teeth. That makes the
gear ratio 25:2 if the worm wheel has 25 teeth. A triple-thread worm
would turn the worm wheel three teeth per revolution of the worm. A worm
gear is a combination of a screw and a spur gear. You can obtain
remarkable mechanical advantages with this arrangement. You can design
worm drives so that only the worm is the driver-the spur cannot drive
the worm. On a hoist, for example, you can raise or lower the load by
pulling on the chain that turns the worm. If you let go of the chain,
the load cannot drive the spur gear; therefore, it lets the load drop to
the deck. This is a nonreversing worm drive.
![]()
What Public Domain Documents are Available for Further Study?
Additional information and explanation is available in the 178 page
US Navy training manual
Basic Machines Training Course,
also known as NAVEDTRA 14037 February 1994.
![]()
Tricks of the Trade & Rules of Thumb for Simple Machines:
- The Mechanical Advantage of a Lever is the the length of the Effort Arm divided by the length of Resistance Arm.
- The Mechanical Advantage of a Block and Tackle (Pulley): count the number of ropes going to and from the movable block (that gives you the mechanical advantage at a glance).
![]()