NEWSLETTER

Enter your email:
Construction Topics
ADS
Become a FB fan
![]()
Construction Network
![]()
 CONSTRUCTION KNOWLEDGE >>
SITE WORK >>
CONSTRUCTION KNOWLEDGE >>
SITE WORK >>
SOILS & GEOLOGY
1. Why Should I Care about Soils?
2. How to Understand a Soil Compaction Proctor Test?
3. How are Soils Classified?
4. What are Soil Boring
Logs?
5. Why Should I Worry about Organic Soils?
6. What Should I Know about Soil Slope Stability?
7. What Practical Geology Should I Know?
8. How Can Knowing about Rock Formations Help
Me?
9. What Public Domain Documents are Available for Further Study?
10. Tricks of the Trade & Rules of Thumb for Soils and
Geology:
Why Should I Care about Soils?
A Construction Supervisor might say, “Soil
engineering and geology? I’m not an engineer and certainly not a
geologist, why would I care about this stuff?” The practical uses for a
basic understanding of soils engineering and geology might surprise that
silly
Construction Supervisor. For example, the placing of soil fill on a site
generally requires testing the compaction. Most Construction Supervisors know
that a “Proctor test” is used and that compaction usually has to be over
95%. But what does it really mean if well placed soil tests at 88% or
even at 103%?
Unless the Construction Supervisor has a basic understanding of soil engineering, he can appear foolish. If the soil tests over 100% and he laughs at the impossibility of compaction over 100%, those that understand the test know that the Construction Supervisor doesn’t. It’s always best not to look like a fool, at least not too many times in one day.
How to Understand a Soil Compaction Proctor Test?
The Proctor test can be understood easily. A soil sample gets taken in the field and dried in the lab. The dry soil then gets divided into different piles, with each pile getting a different amount of water added. So at this point, the lab technician has several soil samples at different moisture levels (say, 12%, 14%, 16%, 18%, 20%).
Each of these soil samples (for a standard Proctor test) is then pounded with a 5.5 pound weight dropping on it 20 times from a height of 12 inches. Of course, the dropping of the weight compacts the soil. To compact soil means to make it more dense. Density is defined as the weight divided by the volume. So each of these compacted soil samples is tested for density. The results are graphed on a Proctor test density chart. The figure below shows a typical set of data.
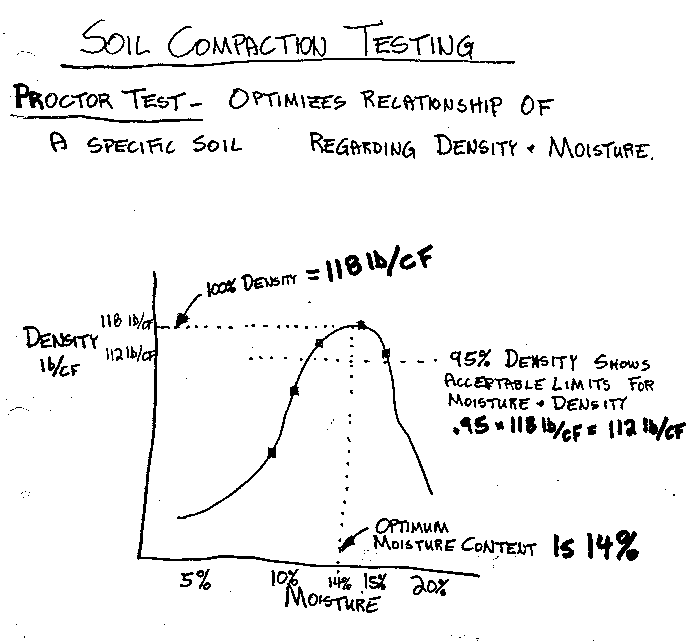
The results seen on the graph tend to correspond with common sense field observations. With too little moisture, soil doesn’t compact too well. By adding some moisture to the compaction process, the soil certainly gets much more firm (i.e. doesn’t deflect or pump under a heavy weight like a truck tire). If too much moisture gets into the soil, as in the case after heavy rains, the soil will simply not compact well.
These common sense observations lead to the conclusion that there is an optimal amount of moisture in soil for good compaction to take place. The example graph shows that optimal amount to be 14%. Reading down the graph, the highest density obtained in this test is 118 pounds per cubic foot. So Figure 1 shows the data from a standard Proctor test. But how does that data get used to determine allowable soil densities and moisture contents?
Simple arithmetic. The highest point on that graph becomes the 100% density and the optimal moisture level. The 95% density and the upper and lower moisture limits are calculated in the figure. The 95% allowable density is 112 pounds per cubic foot and the upper and lower moisture levels are read off the chart..
Just knowing that information about the test, the Construction Supervisor has some useful knowledge. Is it possible to have compaction above 100%? Of course it is. Compacting a soil sample in the lab certainly doesn’t lead to the conclusion that the density achieved is the highest possible density.
An astute Construction Supervisor realizes that several factors could be in play here:
- The amount of force put on the soil in the field, under a heavy roller compacting machine, might be more than was used in the laboratory.
- The soil tested in the laboratory is probably not identical to the soil being tested in the field (since soil by its nature is not completely uniform).
- There could be a mistake in the lab testing or in the field testing.
These conclusions flow from a simple understanding of the nature of soils and the Proctor testing. The Construction Supervisor who understands these issues does his job better.
A bit more understanding of the Proctor test yields some additional information. Many specification books require the soil to be compacted to 95% of modified Proctor testing (ASTM D 1557). This standard uses a 10 pound hammer and an 18” drop. The modified Proctor soil testing is best suited for a heavily compacted base course or the sub-grade for an airfield pavement.
Therefore the modified Proctor soil testing is generally too stringent a standard for earthwork associated with low rise commercial, residential and industrial buildings. The use of this standard with 95% density specified typically penalizes the project with delays since this density is difficult to achieve when soils are wet.
![]()
How are Soils Classified?
Any competent Construction Supervisor should know the basic characteristics of the soil under the project being built. Trench cave-ins, muddy site conditions, dusty site conditions, settlement of structures, settlement of soil backfill and other soil related problems can all aggravate the Construction Supervisor on a project. Some of those problems can go beyond aggravations to huge problems. So learn about soil classifications.
Soils are divided into coarse grained and fine grained, depending on the size of the soil particles. The following simple chart shows the basics of coarse grained soils:
| FIELD IDENTIFICATION OF COURSE GRAINED SOILS | ||
| Table 2 | ||
| Soil Name | Approximate Size Limits | Common Example |
| Boulders | 3" or greater | Orange, Grapefruits, Watermelons |
| Coarse Gravel | 3/4" to 3" | Grape to Orange |
| Fine Gravel | 1/4" to 3/4" | Pea to Grape |
| Course Sand | 1/16" to 1/4" | Rock Salt |
| Medium Sand | 1/64" to 1/16" | Table Salt |
| Fine Sand | .003" to 1/64" | Sugar |
Fine sand particles are the smallest soil individual grain that can
be seen with the naked eye. Fine grained soils, which are silts and
clays, cannot be seen individually without a magnifying glass.
So the Construction Supervisor can get a sense of the size of the soil particles just by grabbing a handful of soil and looking at it closely. The sizes of the various soil particles are noted as well as noting if the particles are too small to see. Since the four basic soil components are gravel, sand, silt and clay, the Construction Supervisor can determine if the soil is mostly gravel or sand or a clay/silt just by looking at it.
The next important soil classification regards cohesion. A cohesive soil sticks together, it has strong bonds between the individual soil particles. Clays tend to be cohesive soils. A simple field test for cohesion involves grabbing a small handful of the soil and rolling it between two hands, trying to create a long, thin thread (think worm or small snake). If the soil sample rolls into a narrow thread (say 4” long and 1/8” thick) it has a high degree of cohesion and is probably mostly clay. If the sample just breaks apart as it begins to roll into the thread, it has much less cohesion and is mostly silt.
In soils the concept of cohesive and non-cohesive is very important. In cohesive soils particles stick together (cohesive literally means mutual attraction between particles. These soils, clays and silts, can generally be squeezed in one's hand to form a ball. Conversely if one squeezes a handful of sand or gravel, there will be no cohesion. Clays may be distinguished from silts by using the following simple tests.
- Dry Strength Test: Mold a small brick of soil and allow it air dry. Break the brick and place a small (1/8") fragment between thumb and finger. A silt fragment will break easily whereas clay will not.
- Dilatancy Test: Mix a small sample with water to form a thick slurry. When the sample is squeezed, water will flow back into a silty sample quickly. The return rate will be much lower for clay.
- Plasticity Test: Roll a moist soil sample into a thin (l/8") thread. As the thread dries, silt will be weak and friable, but clay will be tough.
- Dispersion Test: Dispense a sample of soil in water. Measure the time for the particles to settle. Sand will settle in 30 to 60 seconds. Silt will settle in 15 to 60 minutes, and clay will remain in suspension for a long time.
While these tests certainly do not have to be performed by the Construction Supervisor on every project for every soil, they are frequently helpful. A Construction Supervisor should understand these classifications because soil is literally the base of every construction project.
![]()
What are Soil Boring Logs?
The soil boring logs typically done for a project provide a few valuable pieces of information for the Construction Supervisor. First, the soil classification is given. For example, “clayey sand” means that the soil is mostly sand, but significant amounts of clay as well. If the report says “clayey sand with trace gravel” it means the soil also has small amounts of gravel sized soil in the clayey sand.
What would a clayey sand with trace amounts of gravel look and feel like in the Construction Supervisor’s hand? From the procedures noted above, the handful of soil would look sandy, grain sizes from sugar to rock salt would be visible. But there would also be some of the soil in which the grain size was too small to see. When the Construction Supervisor rolls out the sample into a thread, it would hand together for a while (showing cohesion) but than break apart because of the larger part of cohesionless sand. The trace gravel would just be some random larger rocks visible in the soil.
Of course, soil test in the laboratory provide much more accurate classification for a given sample. A good Construction Supervisor, though, knows how to quickly verify in the field that the soil sample described in the soils report is similar to what is in his hands. The ability to realize when the excavation has uncovered different soils from the lab report can prevent costly settlement errors and even prevent fatalities from trench cave-ins.
Soil classification is important for many reasons on a construction project. Primarily the geotechnical engineer classifies the soil in order to design the foundation system. The Construction Supervisor specifically should be aware of soil classification for the following reasons:
- The type of soil greatly affects the degree of danger for trench cave-ins.
- The on-site subgrade dewatering system is dependant on the type of soil.
- The best method for dealing with wet, muddy conditions or dry, dusty conditions on a project depends on the type of soil involved.
- The compaction requirements and methods for backfill and embankments change for different types of soils.
Soil is often the hardest to predict and most difficult to work with material on a construction project. Unlike steel, aluminum, glass, cement, etc., soil as a construction material tends to be nonhomogeneous (material properties vary widely within a sample). So it pays to understand soils.
![]()
Why Should I Worry about Organic Soils?
Organic soils represent a significant danger for the long-term use of the building, as well as
short term safety issues. Simply stated, organic soils are not
structurally sound, so they can’t be used for foundation bearing and
they can’t be relied on to not cave-in as trench walls.
In the 1980s I was working on a 200 year old stone building on an Army base which showed signs of significant foundation settlement. The general question was, “What could possibly be settling after 200 years?” Soil borings and analysis showed organic material (topsoil) that was under the original building foundations. That topsoil continued to decompose all these years, continuing to settle the building. Organic soils just can’t be allowed under buildings.
An astute Construction Supervisor keeps an eye on the excavation, looking for
soil changes that could cause project problems. Different geographical
areas have different types of organic soils: there is topsoil, peat,
etc. Organic soils are characterized by dark colors, the order of
decomposition, spongy or fibrous texture, and visible particles of
vegetable matter.
What Should I Know about Soil Slope Stability?
Instability of soil slopes causes problems in both
permanent and temporary slopes. The geotechnical engineering required to
calculate slope stability is difficult, expensive and inexact (due to
the non-homogenous nature of soils). As a result many permanent soil
slopes and most temporary soil slopes become a "field condition," never
analyzed, and considered the Construction Supervisor’s problem. Soil slopes are
tricky to understand and frequent failures makes it vital that the
Construction Supervisor understand their nature.
There are two key things to remember. Slope instability is caused by increased stress or a reduced strength in the soil. Some significant factors are as follows:
1.
Increased stress
a.
Increased unit weight of soil wetting
b.
Added external loads (buildings, spoil piles, etc.).
c.
Steeper slopes by excavation or natural erosion
d.
Applied shock loads
2.
Reduced strength
a.
Absorption of water
b.
Shock or cyclic loads
c.
Freeze/thaw action
d. Loss
of cementing materials
e.
Weathering process
It is noteworthy that water both increases stress and reduces strength, and is thereby a factor in most slope failures.
![]()
What Practical Geology Should I Know?
Geological science may appear to be of slight importance to a
Construction Supervisor involved in all the practical details of building a
project. However a basic knowledge of geology allows a Construction
Supervisor to
evaluate rock slope stability, rock excavation methods and equipment, as
well as geological hazards such as sinkholes and landslides. Skilled
application of this information invariably contributes to a projects
success. Ignorance can just as surely lead to failure.
For example, one Construction Supervisor, given the problem of a small sinkhole near a footing, may ignore the problem. Later that sinkhole, by undermining the foundation, causes the building to collapse. A better-informed Construction Supervisor will deal with the problem at the onset, with a minimal cost, and continue the project on track. Therefore, gaining and using geological information properly is a tremendous aid to success.
As one may remember from high school earth science classes, rock is classified as either igneous, sedimentary, or metamorphic. Igneous rocks form by the cooling of the molten magma found deep beneath the surface of the earth. There are two types of igneous rocks. Intrusive igneous rock consists of molten magma that remains far beneath the earth's surface, cools slowly and consequently contains large crystals (such as granite). Extrusive igneous rock erupts at the earth's surface, as a lava flow, for example, and cools rapidly into small crystals (such as pumice).
The second class of rocks, sedimentary, is the consolidated and cemented product of the disintegration and decomposition by weathering of igneous, sedimentary or metamorphic rocks. Mechanical cementation or chemical precipitation at the earth's surface produces the actual sedimentary rock. For example sandstone is literally a cemented material, sand, formed into rock. Small decomposed rock particles, such as sand, are commonly transported by the wind or by a river. As these particles land, or settle to the bottom, and they form a horizontal layer. Mechanical or chemical cementation then forms this layer of sand into rock. This rock would be considered to have a horizontal bedding. It is common, however, to see layers of sedimentary rocks, such as limestone, to be vertical or inclined rather then horizontal. The limestone was formed with horizontal bedding, but as the crust of the earth moves and deforms (over millions of years) the rock layers may be tilted, folded or faulted.
Metamorphic rocks are formed from existing igneous, sedimentary or metamorphic rocks by heat and pressure below the earth's surface. The forming of igneous and metamorphic rock may reverse itself. For example, limestone, a sedimentary rock, can be changed to marble, a metamorphic rock, by heat and pressure below the earth's surface. To review, then, igneous rocks form from molten magma found deep beneath the earth; sedimentary rocks cement small decomposed rock particles together; and heat and pressure below the earth's surface changes other rocks into metamorphic rock.
![]()
How Can Knowing about Rock Formations Help Me?
The ability to field identify rocks on a project may be interesting for
a Construction Supervisor, however rock identification, by itself, has very
limited value. The true usefulness of understanding geology comes as the
Construction Supervisor receives information on rock formations. The formation is
the conventional unit for geologic mapping for the United States
Geologic Survey (USGS).
Formation is defined as an individual rock or combination of rocks sufficiently distinctive to be given a name. State or local governments often have excellent technical information concerning rock formations. An example of how this information becomes available and useful is shown below.
Assume there is a large, industrial building project in Central Pennsylvania with complete plans and specifications available. A state government geologic map indicates the project site sits above the Richland Formation. The PA Bureau of Topographic and Geologic Survey publishes an inexpensive book titled Engineering Characteristics of the Rocks of Pennsylvania which has the following information.
Richland Formation
- Description: gray, finely/crystalline dolomite; medium gray, oolitic limestone; chert; calcarenite; and conglomerate.
- Bedding: well bedded; thick.
- Fracturing: joints have a blocky patter; well developed; moderate to highly abundant; regularly spaced with a moderate distance between fractures; open and steeply dipping.
- Weathering: moderate resistant; slightly weathered to a shallow depth; decomposition results in medium size, blocky fragments; overlying mantle is usually thick; interface between bedrock and mantle is pinnacle.
- Topography: undulating valley of low relief; natural slopes are gentle and stable.
- Drainage: good subsurface drainage; little surface drainage.
- Porosity: solution channels produce a secondary porosity of low to medium magnitude.
- Ground water: where studied, median specific capacity is 2.4 gallons per minute of drawdown.
- Ease of excavation: requires blasting; bedrock pinnacles a special problem; moderate to slow drilling rates with rotary equipment; numerous sandstone beds and chert lenses slow drilling rate.
- Cut-slope Stability: good cut-slope stability, stable in near vertical cuts.
- Foundation Stability: good quality foundation for heavy structures; a thorough sinkhole investigation should be undertaken.
- Construction materials: good for road material, riprap, building stone, embankment facing, and fill.
There is a wealth of information here for the Construction Supervisor. The fracturing, weathering and ease of excavation sections allow the Construction Supervisor and Excavation Contractor to choose the best equipment and method for excavation. Also, production rates can be more accurately calculated for the project schedule. The sections on drainage, porosity and groundwater yield excellent information with which to make dewatering decisions. The cut-slope stability section helps the Construction Supervisor feel comfortable in this area. It seems clear that rock formation information increases the chances for success on a project.
A contractor would be prudent, then, to obtain geologic information for every project undertaken. To incorporate this item into the project start-up is simple, and much of the information can be gathered by a construction secretary.
Many
difficult decisions concerning the site geology are left to the
Construction Supervisor and subcontractors. For example a foundation excavation
may expose a steep rock slope. Geotechnical engineers struggle with the
difficult problem of determining the stability of rock slope. In most
cases, though, the Construction Supervisor and Excavation Contractor must
determine if the rock slope is safe or must be cut back further. The
lives of workmen, and the success of the project, are tied together in
that decision. Information about other geological hazards such as
landslides, sinkholes, earthquakes, etc. can be found in government
publications.
What Public Domain Documents are available for Further Study?
When I was in engineering school, I had a Frenchman teaching our Soil Mechanics class. I could barely understand him, but I think he spent most of the class teaching us about how LaPlace Transformations affect foundation design. Since I never understood LaPlace Transformations in math class, I didn't get any more insight in Soil Mechanics. Whenever anyone asked any kind of practical question, he'd say (at least I think this is what he was saying), "Zat is chust nuts and bolts. If you want zat simple design information, just go to the Navy Design Handbook Number 7." So for your reading pleasure, here is the 394 page US Navy, Soil Mechanics Design Manual Number 7. It's way too complicated in most areas (so much for the "simple nuts and bolts"), but does have lots of good information as well.
Another engineering type resource is the Soils and Geology Procedures for Foundation Design of Buildings, produced by the US Military as UFC 3-220-03FA 16 January 2004. It also tends to be rather complicated, but has a few areas that may be helpful in understanding wall design.
Check the internet for geological resources available in your area.
You may be surprised how much free and useful information abides just a
few clicks away.
Tricks of the Trade & Rules of Thumb for Soils and Geology:
- Obtain soil information at the start of a project. Get a copy of any soil boring or testing reports. Get government soil information if available for the site. Always know what soils you have on a site and their basic characteristics (how they compact, how they act when too wet or when too dry, their stability as a trench wall, etc.)
- Obtain rock formation information at the start of a project, understand the basic characteristics of the rock (ease of excavation, slope stability, drainage, ground water flows, etc.).
- When considering soil slope stability, remember that water both adds to the weight and reduces the soil strength (a double whammy).
- When encountering problems with soil compaction, always consider if the soil sample that was tested in the laboratory is the same as the soil being compacted in the field.
![]()