NEWSLETTER

Enter your email:
Construction Topics
ADS
Become a FB fan
![]()
Construction Network
![]()
 CONSTRUCTION KNOWLEDGE >>
CONCRETE >>
CONSTRUCTION KNOWLEDGE >>
CONCRETE >>
SLABS ON GRADE
1. How Does Concrete Work?
2. What are the Structural Basics for Concrete?
3. What is Reinforced Concrete?
4. What Should I Know About Rebar?
5. Why is the Amount of Water so Important for Concrete?
6. What Should I Know About Concrete Testing?
7. How Do I Get Concrete on the Job?
8. What Public Domain Documents are Available for Further
Study?
9. Tricks of the Trade & Rules of Thumb for Concrete Basics:
How Does Concrete Work?
Modern concrete consists primarily of four components: Portland cement,
sand, gravel and water. A common misconception with concrete is that it
dries and gets hard. Actually, the hydraulic cement reacts with the
water in a chemical process called hydration. As an example, concrete
can be placed underwater and will still change from a liquid state to a
solid state and achieve full strength.
Many additional ingredients can be added to the basic concrete mix in order to change the properties of the resulting concrete. The following list shows some common admixtures (additives) and additional ingredients and their basic purposes:
Admixtures
- Accelerators speed up the hydration, or hardening, of the wet concrete. Often used in colder temperatures so the concrete crew has less waiting time between placing and finishing the concrete.
- Retarders slow the hydration, or hardening, of the wet concrete. Often used in hotter temperatures so the concrete doesn’t set too quickly, allowing the concrete finishing crew to get the proper finishing work completed.
- Air entraining agents add and help distribute tiny air bubbles throughout the concrete. These tiny air bubbles help the concrete resist the freeze-thaw cycles with much less cracking and damage.
- Plasticizers and Superplasticizers improve the workability of the concrete during the wet (or plastic) stage allowing the concrete to flow more easily. They are particularly helpful when placing concrete around congested rebar arrangements. Alternatively, Plasticizers and Superplasticizers can be used to lower the water content in the concrete while keeping a decent level of workability.
- Pigments change the color of the concrete for aesthetic reasons.
Additions
- Fly Ash can replace about half of the required amount of Portland cement. Fly Ash is a by product of coal fired electric generating plants, so is often readily available and economical. Concrete made with Fly Ash and Portland cement can have higher strength and improved chemical resistance and durability. The use of Fly Ash concrete is considered environmentally sound, since most fly ash otherwise ends up in landfills and the energy to produce the replaced Portland cement can also be saved.
- Ground granulated blastfurnace slag (GGBS or GGBFS) can also replace part of the required Portland cement. GGBS is a by product of the steel production process. GGBS has had the most use in Europe and Asia.
- Silica Fume can also replace part of the required Portland cement. Silica Fume is a by product of the manufacture of silica alloys. The particle size of Silica Fume is 100 times smaller than that of Portland cement. Silica Fume improves concrete strength, abrasion resistance and corrosion resistance to chemicals, particularly to salts.
What are the Structural Basics for Concrete?
Concrete is strong in compression. So what does that really mean?
To understand compressive strength, think about several packs of crackers sitting on the floor. If you carefully stand on those packs of crackers, your weight will probably be supported, but you are putting those crackers in compression. Your weight tends towards crushing those crackers. If you jump up and land on those packs of crackers, you will increase the force applied and probably crush the crackers. You will have made the crackers fail in compression.
Now try to jump on a concrete sidewalk. You’d have to jump pretty high to make that sidewalk crush under your weight. In fact, you probably couldn’t make that sidewalk fail in compression. That’s why concrete gets used so much in construction. But the story doesn’t end with compression.
Grab a piece of string and pull in either direction. You’ve just put the string into tension. If you can pull hard enough, the string will fail in tension by snapping. Concrete, while quite strong in compression, fails quickly in tension by cracking. The resistive strength of concrete for compression is around 4,000 pounds per square inch, while the resistive strength for concrete in tension is probably less than 400 pounds per square inch. Generally, the tension strength of concrete is less than 10% of its compression strength.
Builders in the past understood these properties of concrete and stone and typically used those materials only in compression. So walls could be concrete and stone, as could foundations, since both primarily resisted downward compression loads.
Arches are an interesting structural form because arches also act totally in compression. Therefore, arches above windows in old buildings could be concrete or stone because the load transferred around the arch keeping the structure in compression, so tension cracks didn’t occur in the concrete or stone. Barrel vault ceilings are really just three dimensional arches, so they also worked as compression members only.
If an arch above a window got too flat, however, it would stop working as an arch and the bottom of the member would go into tension. So, regular concrete cracks at the bottom of the beam, near the center, in this scenario. The cracking then causes the beam to fail. This example illustrates how concrete fails in tension, which had traditionally been a major design shortcoming for concrete.
When considering the engineering use of materials, a more detailed
understanding of
Basic Structural Analysis helps.
![]()
What is Reinforced Concrete?
In the mid-1800s, builders began adding steel in the concrete to carry
the tension forces. This reinforced concrete became a phenomenally
popular building method. There are several reasons why the combination
of reinforcing steel and concrete works so well:
- The coefficient of thermal expansion is similar for concrete and steel, so when reinforced concretes freezes or gets hot, the two materials contract and expand similarly. If they didn’t, the combination would tear itself apart over time.
- The bond between reinforcing steel bars (rebar) and concrete is strong and efficient. The rebar has surface deformations (ridges) to further improve that bond. Due to the strong bond, the concrete effectively transfers stresses to the steel and vice versa.
- When the cement paste contacts the steel rebar, it forms a non-reactive surface film that inhibits corrosion. This passivation process helps rebar from corroding inside the reinforced concrete.
- The location of the rebar in the structure depends on the use. Simple beams and slabs often only have rebar only on the tension (bottom) side. When a continuous beam spans over top of columns, the tension is at the top of the beam, so rebar is needed at the top of the beam over column supports.
Column footings are interesting to consider. Many people don’t know where the tension side exists on the footing. As a simple way to remember, hold out your left hand with the palm facing up. Now take the index finger of your right hand and poke down into the middle of the outstretched palm. Cup your left hand a bit, as if reacting to the downward force of your index finger. Insert photo here. It’s easy to see that the skin at the bottom of your left hand becomes taut (goes into tension) and the skin on top of your hand gets wrinkly (goes into compression). Therefore, the bottom of a simple concrete footing is in tension right under the column. So the rebar needs to be near the bottom of the footing.
It is important that the reinforcing steel have enough concrete cover so that the concrete bonds to the rebars and allows the concrete and steel to act together as a monolithic structural unit. The concrete cover also protects the reinforcing steel from excessive moisture or chemical corrosion. The American Concrete Institute Building Code recommends the following.
| Rebar Rules for Distance to Edge of Concrete | Minimum Concrete Cover |
| Concrete cast against and permanently exposed to earth | 3" |
| Formed concrete exposed to earth or weather: #5 bar and smaller | 1 1/2" |
| Formed concrete exposed to earth or weather: #6 through #18 bars | 2" |
| Formed concrete not exposed to earth or weather: slabs, walls, joists: #14 & #18 bars | 1 1/2" |
| Formed concrete not exposed to earth or weather: slabs, walls, joists: #11 and smaller bars | 3/4" |
| Formed concrete not exposed to earth or weather: beams and columns: | 1 1/2" |
A simple overview of reinforced concrete design may be helpful here. Concrete is a material high in compression strength and low in tensile strength. Steel, as a material, outperforms concrete 10:1 in compression strength and 100:1 in tension strength. However, steel costs about 50 cents per pound while concrete costs about 2 cents per pound. Thus economical reinforced concrete design uses steel to carry the tension stresses in a structural member and concrete to carry the compression stresses.
Reinforced concrete must be designed with quite a bit of attention paid to Expansion and Contraction. Of course, all building materials have some degree of expansion and contraction, but with reinforced concrete, those forces can literally break the concrete apart.
Two additional properties of reinforced concrete design that are
helpful for the Construction Supervisor to be aware of are Creep and Fatigue.
Again, all structural elements must deal with creep and fatigue, but
concrete can be quite severely changed by those phenomena.
![]()
What Should I Know About Rebar?
The amount of rebar used in typical structures is a small percentage of
the amount of concrete. Most beams, for example, use about 1% rebar for
carrying the tension forces in bending. Columns may use up to 6% rebar,
partly because the rebar carries both tension and axial forces. Since
rebar costs much more than concrete, efficient engineering design
minimizes rebar use.
Rebar is central to reinforced concrete, so a basic understanding
helps. The various sizes are important to know: a #3 bar is 3/8” in
diameter, a #7 bar is 7/8” in diameter, etc. The easy rule of thumb for
rebar sizes is to take the rebar size and divide by 8 for the diameter
in inches.
| Rebar | Diameter | Weight/ft |
| #2 | 2/8"or 0.25" | 0.167 lbs |
| #3 | 3/8" or 0.375" | 0.376 |
| #4 | 4/8" or 0.5" | 0.668 |
| #5 | 5/8" or 0.625" | 1.043 |
| #6 | 6/8" or 0.75" | 1.502 |
| #7 | 7/8" or 0.875" | 2.044 |
| #8 | 8/8" or 1.0" | 2.67 |
| #9 | 9/8" or 1.125" | 3.4 |
| #10 | 10/8" or 1.25" | 4.303 |
| #11 | 11/8" or 1.375" | 5.313 |
| #14 | 14/8" or 1.75" | 7.65 |
| #18 | 18/8" or 2.25" | 13.6 |
As noted above, the structural element needs rebar to carry the tension in the reinforced concrete. So a footing needs rebar on the bottom, a simple beam or slab needs rebar on the bottom, etc. Rebar is also commonly used to help control concrete shrinkage. As concrete cures over time, it continues to shrink. Most of the shrinkage happens in the first few hours, then less shrinkage in the first few days. The shrinkage continues forever, but the amount of change becomes smaller and smaller.
In addition to the shrinkage due to curing, concrete will both expand or contract as a reaction to temperature changes (as do all materials, to some extent). Therefore, additional rebar is often used in a structural element and is called “Temperature Steel”. This rebar helps control concrete cracking due to shrinkage cracks from curing or from temperature changes.
It’s common to see #4s at 12” on center, #3s at 12” on center or even #3s at 18” on center as temperature steel. A Construction Supervisor should be able to look at the drawings for the reinforced concrete members and have an understanding of which rebar is structural and which is temperature steel.
Many times field decisions are made regarding pipes and ducts passing through structural elements, which interfere with the stipulated amount of rebar. Though these decisions should ideally be made by the Structural Engineer, the Construction Supervisor needs to understand enough of the structure to know when to ask. The simple precept, “When in doubt, always ask the Structural Engineer” is easy to say but not particularly practical when a Construction Supervisor makes hundreds of decisions a day. The wise Construction Supervisor understands the whys and hows of rebar use.
In order for reinforcing bars to be in the required location in reinforced concrete, the bars must often be fabricated to special shapes. Typically a steel detailer draws a Shop Drawing that takes the schematic information from the structural drawing and shows the actual bar lengths, bends, clearances, etc. to actually fabricate and install the bars. These Shop Drawings should be carefully reviewed by the Construction Supervisor to check for fit, conflicts and errors.
As soon as one begins reviewing reinforcing steel shop drawings, questions with imbedment and bar splice will arise. Reinforced concrete structures are usually cast in individual segments but the entire structure must act as a single unit. Construction joints create a location to stop the concrete pour, but often it is essential for the stresses in the reinforcing steel to carry through the construction joint. In this case the reinforcing bars continue through the construction joint and spice with bars on the other side. Using too long a splice in uneconomical, because steel costs much more than concrete. Minimum bar splices should be described in the structural drawings and actual splices shown in the reinforcing steel shop drawings.
In the recent past it was common for structural drawings to state a 40 diameter bar lap for all splices. Experience showed that simple solution to be overly conservative in some case and to cause failure in other cases. Therefore, a significantly more complicated set of rules were adapted for bar splicing. It is important for the Construction Supervisor to at least understand the terminology of the American Concrete Institute (ACI) rules for rebar splicing.
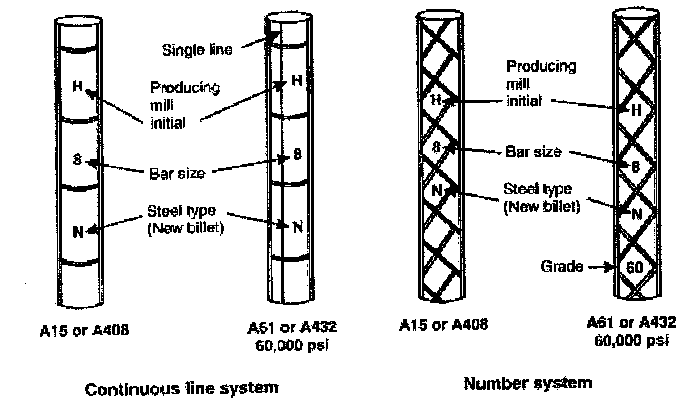
Another helpful fact for rebar concerns the markings required to be on
each bar. The Construction Supervisor should understand the markings, thus able
to pick up a piece of rebar and know its producing mill, bar size and
type and grade of steel. The figure below shows where those markings are
found on rebar.
![]()
Why is the Amount of Water so Important for Concrete?
An important item to understand in concrete work is the water-cement
ratio. A minimum amount of water, approximately 25% of the weight of the
cement, must be included to chemically hydrate the concrete batch. In
the actual mixing process, though, it takes about 35% to 40% water to
work through the mixing process, get to the actual cement, and cause
effective hydration.
In practice, though, much more water gets added to increase the workability of the concrete. So why does it matter if there is lots of water in the concrete mix? Any water above the theoretical ideal of 25% doesn’t get used in the chemical hydration process. Therefore, the excess water remains in the concrete while the concrete cures. Over time, this excess water evaporates out of the concrete and voids remain. These voids weaken the concrete, causing less strength and more cracking.
The water-cement ratio matters to the engineer, but why does the Construction Supervisor care? Anyone who has placed concrete knows how much easier a flowing, more liquid concrete is to place than a drier concrete. There is a tendency to add water to the mix, as it is ready to be placed, to make the concrete flow better. In fact, if the concrete doesn’t flow well, it may not properly surround the rebar (causing a poor bond with the rebar) or it may not flow properly against the forms (causing voids and areas needing patching). Insert photo.
So, a conflict often exists on the jobsite:
- Add water to the concrete mix to make it flow better, but weaken
the quality of the concrete (both strength and crack resistance)
or - Don’t add water to the concrete mix to keep the proper water-cement ratio but work harder to place the concrete and possibly have significant voids.
The easy answer is never add water on the site to concrete, but that
answer ignores the reality of the placement dilemma. This is often a
complicated decision, with Structural Engineers, Building Officials,
Specifications, Concrete Foreman and others all having input. It’s
important the Construction Supervisor at least be aware of this issue for every
concrete placement and understand how the decision to add water will be
handled.
![]()
What Should I Know About Concrete Testing?
The concrete Slump Test was created to help consistently measure the
concrete workability. The "workability" of the concrete is an important
factor for those placing the concrete. A workable concrete mix properly
flows and fills the form properly, leaving minimal voids at the form
face and completely surrounding any rebar to create a bond.
The Slump Test should be familiar to most workers on a construction site. The wet concrete is placed in a steel cone form and placed on a non-absorbent surface, with the wider portion of the cone being down. The steel cone form is then lifted off, allowing the wet concrete to slump down a bit, depending on the mix design. A dry mix may only slump 1” to 2”. Normally specified slump is around 4”. Slumps of 6” to 7” can be achieved through the use of high range water reducing agents (super-plasticizers). Special mixes for pumping concrete tend to have high slumps.
Another important test for concrete is the cylinder compression test. Concrete strength is generally called its 28 day compressive strength. Why 28 days? What is magic about 28 days? Nothing. The 28 day period for testing the compressive strength of concrete is an arbitrary time selected to give consistency to the testing procedures. Thus, the 28 day compressive strength of concrete has become the standard in the industry. So when 4,000 psi concrete is specified for a concrete beam, this means that the actual placed concrete should have a compression strength above 4,000 psi after 28 days. Since the strength of concrete continues to increase over time, a standard time period for concrete strength measurement is necessary.
The concrete cylinders that are made to determine the 28 day strength can also be broken earlier and provide useful information. Cylinders are commonly broken at 7 days, which normally have developed about 75% of the 28 day strength. It’s nice to know 3 weeks earlier if there is a problem with a concrete batch.
Breaking cylinders at 3 days can also yield useful data. If a supported slab has been placed, the 3 day concrete breaks can be used to determine if stripping or the forms and form supports will be safe. So concrete cylinder breaks provide a number of useful bits of information.
The basics of making the cylinders should be understood by the Construction Supervisor. When the wet concrete is being placed, cylinders 6” in diameter and 12” high are filled with concrete and carefully consolidated, (see Making Concrete Cylinders for Testing). These cylinders then cure, hopefully in conditions similar to the curing conditions for the main concrete pour. The concrete cylinders harden in a few hours and are stored for future testing.
That testing consists of placing the cylinder in a machine that presses on the cylinder top and bottom, adding axial force until the cylinder crushes. The amount of force required to crush the cylinder becomes the compressive strength for that cylinder.
As an example: Note: do calcs in ink on paper and scan into the document as a separate file.
------------------------------------------
For a concrete sample that is broken after 28 days
The cylinder is 6” diameter, so it has an area of 3.14 x Diameter squared /4
A = 3.14 x 6 x 6/4
A = 28.26 square inches
If the force required to break the cylinder was 97,500 pounds
Then the compressive strength is 97,500 pounds / 28.26 square inches
= 3,450 psi
------------------------------------------
The Construction Supervisor also needs to pay attention to the care and storage of the concrete test cylinders between the time they are made and broken. A few years ago, during the construction of an addition to a sewage pumping station building, the Construction Supervisor stored the concrete test cylinders inside the pumping station for protection from harsh weather. When the cylinders were broken at 28 days, the supposedly 4,000 psi concrete was achieving only 2,500 psi of compressive strength. Talk immediately began about tearing out the new concrete walls and the finger pointing for responsibility started. A core boring was taken from the wall and the concrete tested well above the 4,000 psi requirement.
So what happened? It seems no one considered what a constantly vibrating pump room floor would do to the setting process of the concrete. The moral of the story is that concrete test cylinders cause enough problems on a project that the Construction Supervisor should have a clear, agreed upon plan for their making, storing, breaking and reporting.
![]()
How Do I Get Concrete on the Job?
Concrete can be mixed on site or purchased from vendors in Ready Mix
trucks. Ready Mix concrete has the ingredients mixed at the Ready Mix
plant according to a set recipe for the requested mix. The advantages of
Ready Mix concrete are the uniformity in handling the raw materials
(ingredients), the supplier’s experience with how a certain mix design
will perform (3 day strength, 28 day strength, workability, etc.) and
convenience. The disadvantages of Ready Mix concrete can be the
following: long driving times (if plant is far from job site) in which
the concrete becomes less workable, difficulty in obtaining concrete at
times and quantities that are needed and cost.
Concrete batch plants are utilized on large construction projects to mix the concrete on site. The advantages of job site batch plants are ability to get concrete in necessary times and quantities, eliminating traveling issues, and cost. The disadvantages of concrete batch plants are the amount of equipment, labor and job site space required to make the process work and potential concrete quality problems since mix designs will not have had much previous experience.
Of course, for very small concrete projects, concrete can be mixed on the job site by hand or in portable concrete/mortar mixers. It’s important to understand that concrete mixed in this way is unlikely to be as uniform as Ready Mixed concrete, due to the variations inherent in the process:
- Measuring (often done by shovels) will be much less precise.
- Moisture levels in sand and gravel will be unknown (thus adding water to the mix).
- The water-cement ratio will be determined by feel rather than by measurement.
These issues don’t mean that job site mixed concrete will be unacceptable, only that the quality of the concrete will be much more variable than Ready Mixed concrete. Therefore, the Construction Supervisor should use caution in allowing job site mixed concrete if the final attributes of the concrete are critical (i.e. if 4500 psi concrete is needed for concrete columns or if any cracking of the floor would be a major problem).
If small quantities of concrete are to mixed on the job site, the
information provided in Figure 1.14 should be helpful. Insert Figure
1.14.
![]()
What Public Domain Documents are Available for Further Study?
This US Department of Army
Concrete and Masonry Field Manual does a great job explaining
Concrete and Masonry basics. It's 323 pages of figures, basic
explanations and instructions of how to do the work. If you are somewhat
new to construction, take some time and review this excellent resource.
The official name is US Army FM 5-428.
Another great all around great construction introductory guide that covers some concrete installation items is the US Navy Builder Training Course Volume #1. The official name of this 332 page resource is Builder 3 and 2, Volume #1, NAVEDTRA 14043.
The US Navy produced a chapter about rebar in their Steelworker Volume 2 training manual that has some good information. Titled Steelworker Volume 2 Training Manual, the official name is NAVEDTRA 14251, November 1996.
The US Dept of Defense produced a 59 page training document that has some good joint details and design guides for understanding Concrete Floors. Titled Concrete Floor Slabs on Grade Subjected to Heavy Loads, the official name is UFC 3-320-06A, 1 March 2005.
The US Air Force Training Guide for Structural Concrete work
is a 39 page training guide that teaches a few basic concrete skills.
It's found at
Air Force Qualification Training Package for Structural Concrete.
Tricks of the Trade & Rules of Thumb for Concrete
Basics:
- Know the different concrete mixes specified for the project. Pay attention not just to required 28 day strength (3,000 psi, 4,000 psi, etc) but also to likely admixtures and additions to the mix.
- Know the concrete testing required for each concrete mix and have a clear plan for how the testing will be accomplished.
- Get in the habit of looking at the rebar and understanding the structural rebar locations and the temperature steel locations.
- Know how to read the markings on a piece of rebar to determine its producing mill, bar size and type and grade of steel.
![]()